
Minecraft has been renowned among game enthusiasts for the past few years. This game is available for any platform, including Android, iOS, Mac, and Windows. As with other games, Minecraft takes up your RAM. That becomes the issue is that Minecraft uses only 1 GB of RAM by default. Fortunately, you can allocate more RAM for the better game experience. How to allocate more RAM to a Minecraft server?
You don’t need to be a computer geek or game expert to resolve this problem. Thanks to the 2.0.0 update that makes everything easier. Allocating more RAM to Minecraft can be easily performed as long as you follow the correct instructions.
Table of Contents
What Is Minecraft Server?

If you are a newbie who has no idea what Minecraft server really is, you have come to the right place. Minecraft server is actually a multiplayer mode available on Minecraft. You can play and interact with other players, either online or via LAN. Long story short, Minecraft server is created to offer a better experience for Minecraft players.
Hosting a server requires you to provide many tools in order to manage and host the server. The requirements include default multiplayer software, LAN, external server clients, rented servers, realms, and dedicated servers. The server is then managed by operators and administrators to ensure it runs smoothly.
To host a Minecraft server, there are several requirements that should be fulfilled. These requirements may vary depending on the used server software. When it comes to the RAM requirement, the Minecraft server typically takes up at least 3GB of your RAM. The more memory it has, the better. For this reason, you can improve the gaming experience by allocating more RAM to a Minecraft server.
How to Allocate More RAM to a Minecraft Server without Launcher
If you think that Minecraft uses a too small amount of RAM on a server, you can add more RAM to enhance its performance. But make sure your computer still has spare memory for this. The process is pretty simple, though it may need a little effort and attention. The instructions below will help you solve the small RAM problem.
- Get access to the Minecraft server directory on your computer. The directory is a folder that contains a file with Minecraft_server.exe. You can also search the Minecraft server if you are not sure where it is located.
- Click Home, then select New Item. After that, create a text document in the directory by choosing the Text Document.
- Open a new text document and type the following: java -Xmx####M -Xms####M-exe Minecraft_Server.exe -o true PAUSE

- Then, replace the #### with the amount of RAM you want to allocate in MB. For example, you can input 3072 if you want to allocate 3 GB to the Minecraft server. Remember that 1 GB is equal to 1024 MB.
- Save the document by clicking File, then Save As. Change the type to All Files. Be sure to replace the extension to .bat not .txt.
- The document you have made now becomes the new launcher. To run the launcher, double click the file.
How to Allocate More RAM to a Minecraft Server with Default Launcher
To give more RAM to Minecraft server, you need to have the right version of Java. Without it is installed on your computer, you will not be able to upgrade more RAM to the server. This means you can only use the default amount RAM. Download Java 8 64 bit and you are ready to get more RAM to Minecraft server.
After downloading the right version of Java, the following steps will help you allocate more RAM with the launcher.
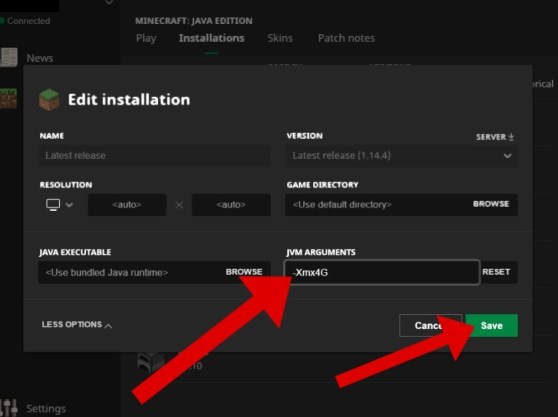
- Open your Minecraft. Navigate to the Installations tab.
- Select your version, then press the icon with 3 dots. Click edit.
- Click More Options to open the drop-down menu. Navigate JVM ARGUMENTS. There will be something like this “-Xmx2G-XX:+UnlockExperimentalVMOptions”.
- You will need to pay attention to the –Xmx2G. The figure 2 represents the amount of allocated RAM. In this case, it uses 2GB.
- Change the amount of allocated RAM by replacing the figure to your desired amount. Be sure to replace it with the right amount that your computer can handle and don’t allocate all the RAM on your computer to Minecraft, because your computer needs some RAM capacity to run other processes.
How to Allocate More RAM to Minecraft Server with Twitch Desktop App
Another way to change the amount of allocated RAM on a Minecraft server is by using Twitch desktop app. When using this app, you can make adjustments effortlessly by following this.

- Open Twitch Desktop app you have installed on the computer. Click 3-line icon that you can find on its top left. Choose File, then select Settings.
- Find Minecraft tab and navigate to Java Settings.
- At this point, you will see the Allocated Memory bar.
- To change the amount of allocated RAM to Minecraft, simply drag the bar. Be careful in dragging the bar, make sure it fits your computer’s capacity.
How to Allocate More RAM to Minecraft Server with Other Launchers
There are some other launchers that you can use to change RAM allocation to a Minecraft server. Among available launchers, you may opt Voidswrath and ATLauncher that offer you with convenience. It takes only three steps to change the amount of allocated RAM using these launchers.
1. VoidLauncher

- Open the launcher. Navigate to Options that you can find on the top right of the page.
- Find Minecraft Options, then click the memory dropdown. You can change the allocated RAM to the desired amount.
- After changing the amount of allocated RAM, you can launch the game with a better experience.
2. ATLauncher

- Open ATLauncher, then click Settings on its bottom right.
- Navigate to Java or Minecraft tab. After that, you need to locate Maximum Memory/RAM.
- Change the amount of allocated RAM and you are ready to go.
To add more amount of RAM allocation to a Minecraft server is not a difficult task if you know what to do. Even if you are a beginner, changing RAM allocation is pretty easy. There are several ways that you can take to give more amount of RAM for the best gaming experience. Be sure to input the right amount of RAM that your computer can handle.